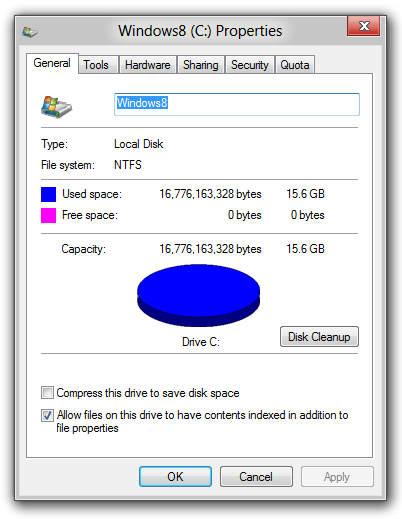
We were almost out of disk space for our 2 databases at Linode and upgrading to a higher instance was significant and cost prohibitive. Since we had been looking at Google Cloud Platform for some time, we decide to make the move there as we would be able to have double the amount of disk space for a little less than what we’re previously paying at Linode.
This is a step by step guide, written with our Operations Engineer Vladimir Blando, shows how we did that and took advantage of the instance sizes and disk space available at Google Cloud Platform.
The Why
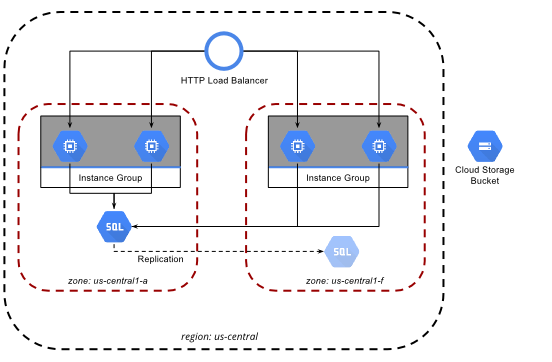
Maintaining at least 2 MySQL Database Servers in a Master-Slave setup is essential for high availability of any database. Usually, due to the size and scale of a database, simple maintenance or even planned downtime is costly in terms of hours. Thus we want to always maintain a backup server or 2 to failover to in case the need arises.
We run a very large dataset at Galleon, approaching 1TB in size per database and growing by the day. Our current provider, Linode, was good and cost-effective during our initial years but as we needed more and more space for our database, we quickly exceeded each instance size. There was only 1 more instance size up that came with 1.5TB of SSD and it was quite expensive. Also because all we needed was disk space, we were wasting the CPU and RAM on the large instances we were using for our database.
Linode has a Block Storage product but it is not SSD and had some limits when we were using it during the beta. We previously tried to migrate to their block storage but since it was using regular HDD’s, our database slowed down significantly. Their current offering is available in some of their data centers and has limits of up to 10TB but overall we were looking at the cost savings and opportunity to expand on Google Cloud Platform.
In terms of cost, SSD Persistent Disk at Google Cloud Platform is not cheap, but we were able to provision 2x the amount of SSD Persistent Disk for about the same price as what we were paying at Linode. This would give us room to grow and do maintenance on our data as needed without being worried about hitting disk limits. We also considered a 3 node cluster setup like Galera or MaxScale but are needs are not there yet and it would be added expense.
The How
We already had an account we were using for testing other services at Google Cloud Platform. So we went about investigating what the right size instance we would need and how much disk space we would need. We used their Pricing Calculator as it makes it easy to estimate all of this and compare solutions.
We were considering adding Local SSD drives instead of Persistent Storage because of the cost savings, but because Local SSD can go away at any moment we decided that risk was not worth it for our primary database. If perhaps in the future our database failover is more automated and resistant to failure we can look at the option. Also Local SSD has physical limits which we may hit anyway.
We created 2 MySQL servers on Google Cloud Platform running the latest version of MariaDB and set them up as Slave servers of our current Master server on Linode. The data would then replicate over and once it had caught up we would initiate a manual failover to the Google Cloud Platform servers so that our new Master server would be on GCP. We perform our MySQL failover using MHA (Master High Availability Manager) but that is topic of an entirely different blog post.
Setting Up Our Requirements
These are the main tools we will be using to set up our machines.
Google Cloud Platform (GCP) Account - Google Cloud Platform Signup
Add a billing account that comes with $300 of free usage.
GCloud CLI - Install Instructions
You may install it using
brewon OSXbrew cask install google-cloud-sdkWe will run everything using the
gcloudCLI tool.Start by initializing the Google Cloud SDK
gcloud initGoogle Cloud Platform Project - We need to create a project in order to run every we do related to our swarm in this project. Each app/website and environment you use should ideally have its own GCP Project.
The project id in this example is
mysql-databasesbut yours should be unique.- Create the project using the
gcloudtool
gcloud projects create "mysql-databases" \ --name="Production MySQL Cluster"- Store your GCP Project Id and Default Zone in an environment variable.
# Store your Project Id in ENV vars GCP_PROJECT_ID=mysql-databases # Store your Zone Id in ENV vars GCP_ZONE_ID=us-central1-a- Enable the Google Compute Engine API for your Project Id by visiting the following URL: https://console.developers.google.com/apis/library/compute.googleapis.com/?project=mysql-databases
It will also ask you to connect a Billing Account if you haven’t already done that for your project.
- Create the project using the
Creating Our MySQL Databases Servers
For our setup we are going to use 1 master node and 1 slave node, but you can customize this up to as many nodes and across as many regions as you like.
First, let’s create our persistent disks where we will store the large amounts of data for our database
We are using
20GBSSD disks for speed and space, you may adjust this to your needs. The current default SSD quota for a trial account is100GBand500GBfor an upgraded account.for counter in {1,2,3}; do gcloud compute --project=${GCP_PROJECT_ID} disks create "mysql-data-${counter}" \ --zone=${GCP_ZONE_ID} \ --type=pd-ssd \ --size=20GB doneGet the
Compute Engine Default Service Accountwhich we will use for accessing ourCompute Instances.$ gcloud iam --project=${GCP_PROJECT_ID} service-accounts list NAME EMAIL Compute Engine default service account [email protected] $ GCP_SERVICE_ACCOUNT=123456789-compute@developer.gserviceaccount.comCreate the instances that will be running our MySQL services
We will be using the
n1-standard-1Machine Type which comes with1 CPUand3.75GB RAM.We are also using the
centos-7-v20180401as the operating system for our machines. You may need to use a different flavor of Linux if you commonly run something else.for counter in {1,2,3}; do gcloud compute instances create "mysql-db-${counter}" \ --project=${GCP_PROJECT_ID} \ --zone=${GCP_ZONE_ID} \ --machine-type=n1-standard-1 \ --subnet=default \ --maintenance-policy=MIGRATE \ --service-account=${GCP_SERVICE_ACCOUNT} \ --scopes=https://www.googleapis.com/auth/devstorage.read_only,https://www.googleapis.com/auth/logging.write,https://www.googleapis.com/auth/monitoring.write,https://www.googleapis.com/auth/servicecontrol,https://www.googleapis.com/auth/service.management.readonly,https://www.googleapis.com/auth/trace.append \ --min-cpu-platform=Automatic \ --tags=mysql \ --image=centos-7-v20180401 \ --image-project=centos-cloud \ --boot-disk-size=10GB \ --boot-disk-type=pd-ssd \ --boot-disk-device-name=mysql-boot \ --disk=name="mysql-data-${counter},device-name=mysql-data,mode=rw,boot=no" doneOnce your nodes are online you can also view and access them on the Google Cloud Platform console or use the
gcloudcommand.$ gcloud compute instances list \ --project=${GCP_PROJECT_ID} \ --filter="zone:(${GCP_ZONE_ID})" NAME ZONE MACHINE_TYPE PREEMPTIBLE INTERNAL_IP EXTERNAL_IP STATUS mysql-db-1 us-central1-a n1-standard-1 10.x.x.x 35.x.x.x RUNNING mysql-db-2 us-central1-a n1-standard-1 10.x.x.x 35.x.x.x RUNNING mysql-db-3 us-central1-a n1-standard-1 10.x.x.x 35.x.x.x RUNNING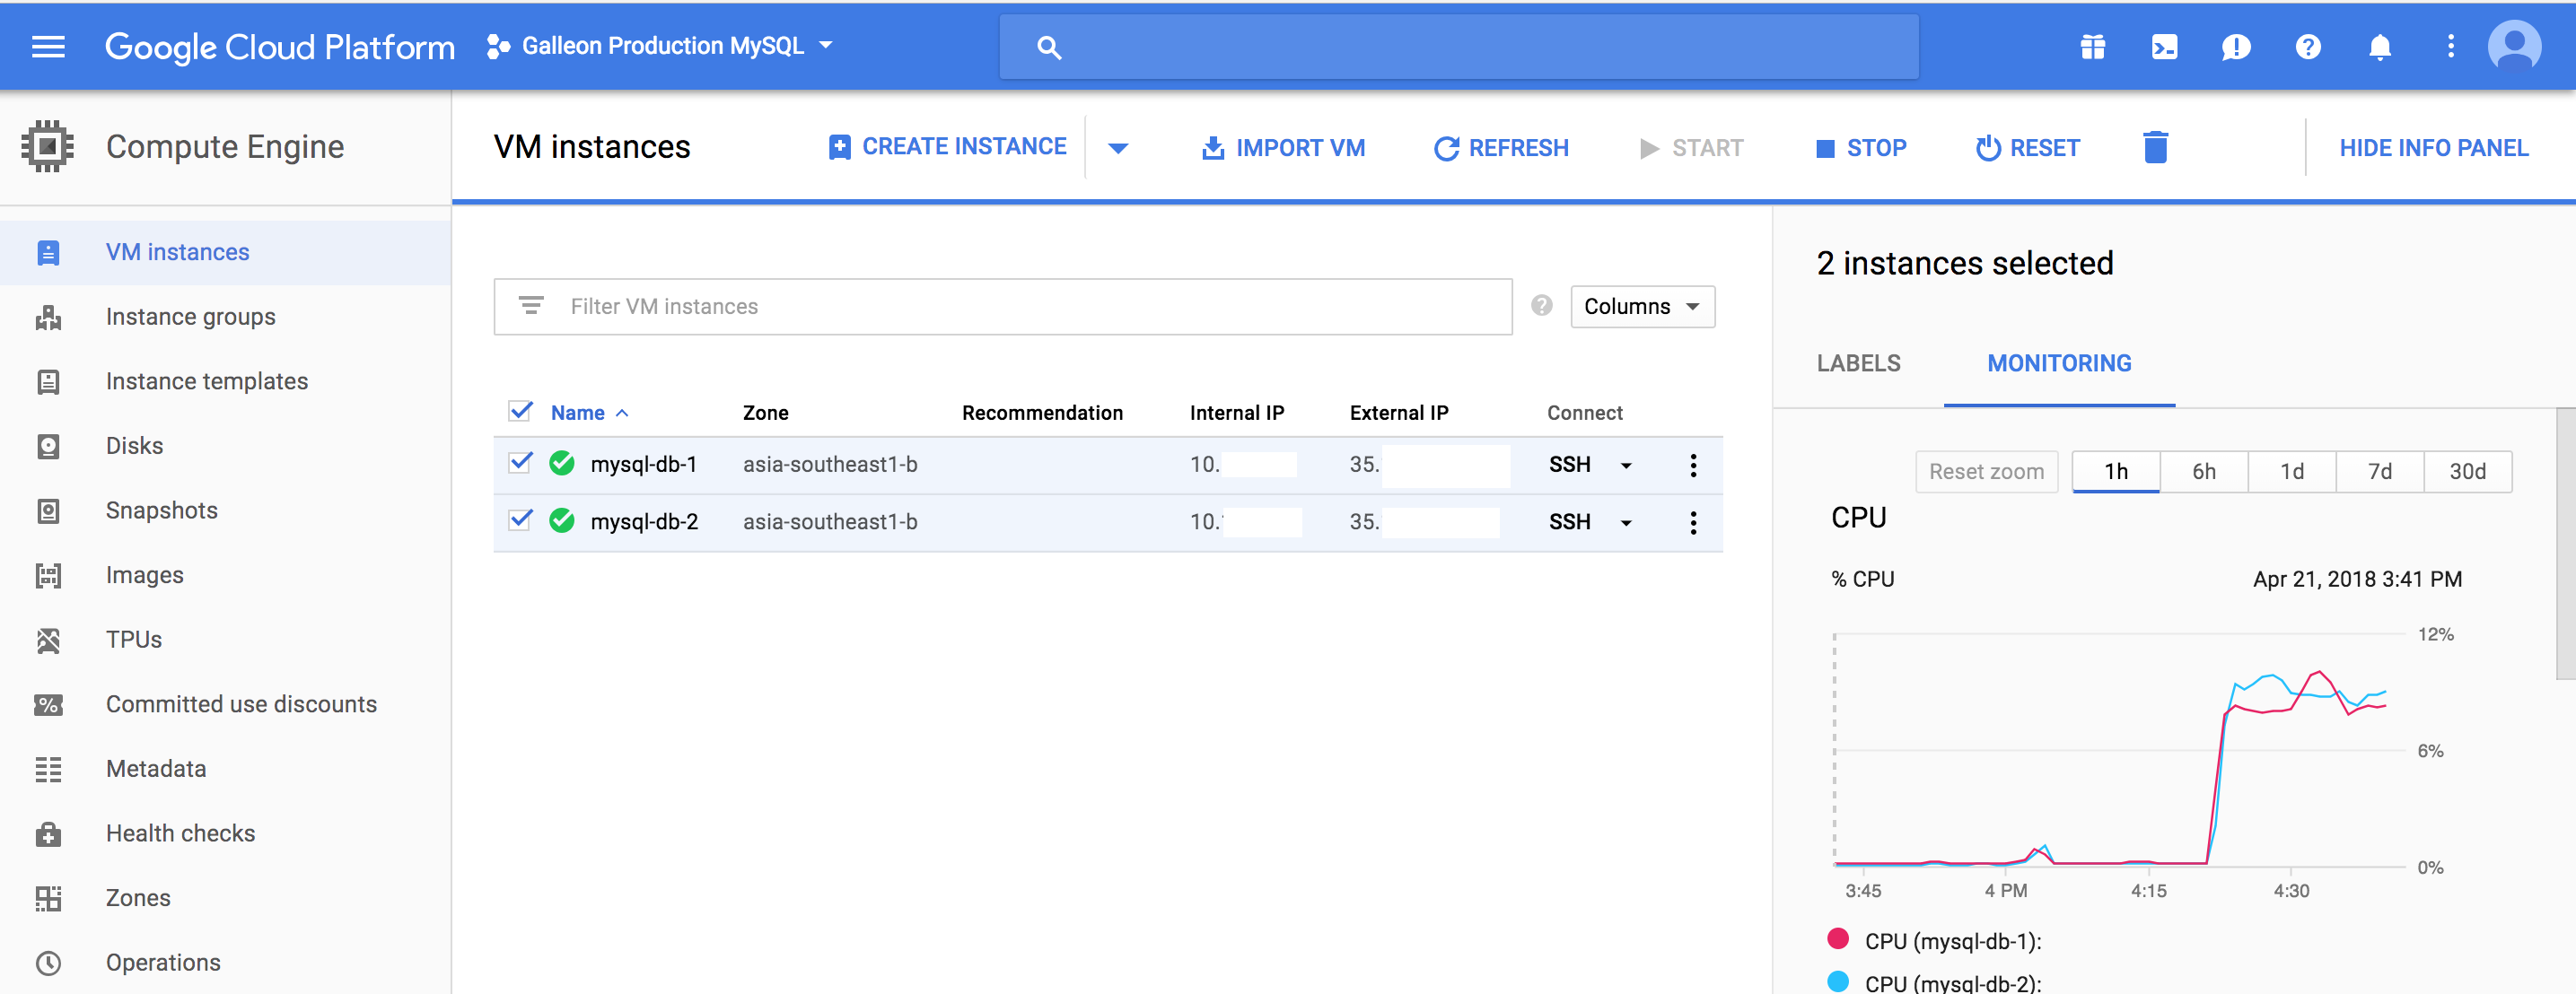
Setting up our MySQL Servers
Once we have created our MySQL nodes, we need to set them up properly
SSH into each server
gcloud compute ssh \
  --project ${GCP_PROJECT_ID} \
  --zone ${GCP_ZONE_ID} \
  "mysql-db-1"
Preparing our Persistent Disks
We are going to format and attach the persistent disk we created to store our data using this guide from Google Cloud Platform
Find the Device ID of the disk we attached when we created the instance
$ sudo lsblk

NAME   MAJ:MIN RM SIZE RO TYPE MOUNTPOINT
sda      8:0    0  10G  0 disk
└─sda1   8:1    0  10G  0 part /
sdb      8:16   0  20G  0 disk
Format the new disk:
CAUTION: This command will delete all data on
/dev/sdbsudo mkfs.ext4 -m 0 -F -E lazy_itable_init=0,lazy_journal_init=0,discard /dev/sdbCreate the folder where we are going to mount this disk and mount it
sudo mkdir -p /mnt/disks/mysql-data
sudo mount -o discard,defaults /dev/sdb /mnt/disks/mysql-data
sudo chmod a+w /mnt/disks/mysql-data
Add the disk to our
/etc/fstabfile or else we will have to mount it manually whenever the instance restarts.sudo cp /etc/fstab /etc/fstab.backup echo UUID=`sudo blkid -s UUID -o value /dev/sdb` /mnt/disks/mysql-data ext4 discard,defaults,nofail 0 2 | sudo tee -a /etc/fstabConfirm that the disk is mounted and added to our
/etc/fstabfile:$ cat /etc/fstab UUID=25d25b49-e214-4c1d-a570-3538841e66c3 / xfs defaults 0 0 UUID=63421796-41d5-4f85-8623-433393f36a2d /mnt/disks/mysql-data ext4 discard,defaults,nofail 0 2$ df Filesystem 1K-blocks Used Available Use% Mounted on /dev/sda1 20953560 1394684 19558876 7% / devtmpfs 6578940 0 6578940 0% /dev tmpfs 6585704 0 6585704 0% /dev/shm tmpfs 6585704 8492 6577212 1% /run tmpfs 6585704 0 6585704 0% /sys/fs/cgroup tmpfs 1317144 0 1317144 0% /run/user/1000 tmpfs 1317144 0 1317144 0% /run/user/0 /dev/sdb 2113646512 81944 2113548184 1% /mnt/disks/mysql-data
Installing the MySQL Service
We need to install the MySQL service and configure it properly to use our disks. For this tutorial, we are going to use Maria DB 10.2 but you may opt to use a different version of MySQL.
Add the MariaDB YUM Repository and install MariaDB
curl -sS https://downloads.mariadb.com/MariaDB/mariadb_repo_setup | sudo bash

sudo yum install mariadb-server mariadb -y
Start the MySQL Server and run the MariaDB Install Script
sudo systemctl start mariadb
sudo mysql_secure_installation
Move Data to the Persistent Disk
Stop the MySQL Server and move the MySQL Data Directory to our Persistent Disk
sudo systemctl stop mariadb
sudo rsync -av /var/lib/mysql /mnt/disks/mysql-data
Rename the old MySQL Directory to avoid confusion
sudo mv /var/lib/mysql /var/lib/mysql.bakUsing chcon command, change the SELinux context type in the new directory as shown below.
sudo chcon -R -t mysqld_db_t /mnt/disks/mysql-dataMake a new
/tmpdirectory in this new disk so that large operations will fit on the disk.sudo mkdir /mnt/disks/mysql-data/tmp sudo chmod 777 /mnt/disks/mysql-data/tmpEdit the MySQL Settings to reflect the new location of the MySQL Data Directory
$ sudo vi /etc/my.cnf.d/server.cnf

[mysqld]
datadir=/mnt/disks/mysql-data/mysql
socket=/mnt/disks/mysql-data/mysql/mysql.sock
tmp=/mnt/disks/mysql-data/tmp
$ sudo vi /etc/my.cnf.d/mysql-clients.cnf [client] port=3306 socket=/mnt/disks/mysql-data/mysql/mysql.sockStart up the MySQL Server
sudo systemctl start mariadb
sudo systemctl status mariadb
Master Server: Replication Settings
On the MySQL Master, configure the replication and binary logs settings.
The
server_idmust be unique for each MySQL Server across both master and slaves.$ sudo vi /etc/my.cnf.d/replication.cnf [mysqld] server-id=1 log-basename=master log-bin expire-logs-days=3 binlog-format=row binlog-do-db=db-nameRestart the MySQL Service for the binary logging to start for replication.
sudo systemctl restart mariadbSetup MySQL Slave User on the Master Server
All Slave Servers will use the same username and password to connect to the Master Server.
$ mysql -u root -p

MariaDB [(none)]> STOP SLAVE;
MariaDB [(none)]> GRANT REPLICATION SLAVE ON *.* TO 'slaveuser'@'%' IDENTIFIED BY 'securepassword';
MariaDB [(none)]> FLUSH PRIVILEGES;

MariaDB [(none)]> SHOW MASTER STATUS;
+--------------------+----------+--------------+------------------+
| File               | Position | Binlog_Do_DB | Binlog_Ignore_DB |
+--------------------+----------+--------------+------------------+
| mariadb-bin.000001 |      460 | db-name      |                  |
+--------------------+----------+--------------+------------------+
Slave Servers: Replication Settings
On the MySQL Slave, configure the replication process settings.
The
server_idmust be unique for each MySQL Server across both master and slaves.$ sudo vi /etc/my.cnf.d/replication.cnf [mysqld] server-id=2 replicate-do-db=db-name read-onlyRestart MySQL
sudo systemctl restart mariadb
Start Slaves from the Beginning
If you are starting a new MySQL Master with no data you may start the slaves from the beginning, else see the next section where we sync the slave servers for an existing MySQL Master.
Configure the replication process on the Slave Server and start the replication
mysql -u root -p

MariaDB [(none)]> STOP SLAVE;
MariaDB [(none)]> CHANGE MASTER TO MASTER_HOST='<MASTER_SERVER_IP>', MASTER_USER='slaveuser', MASTER_PASSWORD='securepassword', MASTER_LOG_FILE='mariadb-bin.000001', MASTER_LOG_POS=460;
MariaDB [(none)]> START SLAVE;
Sync Slaves from Master MySQL Dump
Instead of having to start the slaves from scratch and since you usually rotate the binary logs or may already have a database and you want to bring another Slave server online, you need to bring the Slave servers up to date with a recent mysqldump of the Master Database, and then start the Slave server replication process from there.
Log into the MySQL Master server and create a database dump using
mysqldumpYou should do this in another process using
screenortmuxas these are long-running processes.- We need to lock the database first so no writes are performed and we get the exact binary log filename and position.
$ mysql -u root -p db-name MariaDB [(none)]> FLUSH TABLES WITH READ LOCK; MariaDB [(none)]> SHOW MASTER STATUS; +------------------+----------+--------------+------------------+ | File | Position | Binlog_Do_DB | Binlog_Ignore_DB | +------------------+----------+--------------+------------------+ | master-bin.000143| 16728178 | db-name | | +------------------+----------+--------------+------------------+ 1 row in set (0.00 sec)- Do not exit the MySQL terminal, in another window perform the MySQL Dump
mysqldump -u root -p db-name | gzip -c > ./db-name.sql.gz- Once the
mysqldumpis done, you can go back and unlock the database and continue with normal database operations
MariaDB [(none)]> UNLOCK TABLES;Rsync the newly created database dump to the slave server(s)
rsync -rav ./db-name.sql.gz 35.x.x.x:/mnt/disks/mysql-data/ --progressImport the new database
sudo gzip -d /mnt/disks/mysql-data/db-name.sql.gz
sudo cat /mnt/disks/mysql-data/db-name.sql | mysql -u root -p db-name
Configure the replication process on the Slave Server and start the replication with the binary log filename and position from Step 1.
$ mysql -u root -p

MariaDB [(none)]> STOP SLAVE;
MariaDB [(none)]> CHANGE MASTER TO MASTER_HOST='<MASTER_SERVER_IP>', MASTER_USER='slaveuser', MASTER_PASSWORD='securepassword', MASTER_LOG_FILE='master-bin.000143', MASTER_LOG_POS=16728178;
MariaDB [(none)]> START SLAVE;
Confirm Replication Status
Check the status of the replication to see how far the slave is behind the master:
$ mysql -uroot -p -e "show slave status \G"

*************************** 1. row ***************************
               Slave_IO_State: Waiting for master to send event
                  Master_Host: 35.x.x.x
                  Master_User: slaveuser
                  Master_Port: 3306
                Connect_Retry: 60
              Master_Log_File: master-bin.000046
          Read_Master_Log_Pos: 389652740
               Relay_Log_File: mariadb-relay-bin.000100
                Relay_Log_Pos: 389653036
        Relay_Master_Log_File: master-bin.000046
             Slave_IO_Running: Yes
            Slave_SQL_Running: Yes
              Replicate_Do_DB: db-name
          Replicate_Ignore_DB:
           Replicate_Do_Table:
       Replicate_Ignore_Table:
      Replicate_Wild_Do_Table:
  Replicate_Wild_Ignore_Table:
                   Last_Errno: 0
                   Last_Error:
                 Skip_Counter: 0
          Exec_Master_Log_Pos: 389652740
              Relay_Log_Space: 389653387
              Until_Condition: None
               Until_Log_File:
                Until_Log_Pos: 0
           Master_SSL_Allowed: No
           Master_SSL_CA_File:
           Master_SSL_CA_Path:
              Master_SSL_Cert:
            Master_SSL_Cipher:
               Master_SSL_Key:
        Seconds_Behind_Master: 0
Master_SSL_Verify_Server_Cert: No
                Last_IO_Errno: 0
                Last_IO_Error:
               Last_SQL_Errno: 0
               Last_SQL_Error:
  Replicate_Ignore_Server_Ids:
             Master_Server_Id: 1
               Master_SSL_Crl:
           Master_SSL_Crlpath:
                   Using_Gtid: No
                  Gtid_IO_Pos:
      Replicate_Do_Domain_Ids:
  Replicate_Ignore_Domain_Ids:
                Parallel_Mode: conservative
                    SQL_Delay: 0
          SQL_Remaining_Delay: NULL
      Slave_SQL_Running_State: Slave has read all relay log; waiting for the slave I/O thread to update it
Cleaning Up The Cluster
To delete your instances and disks and go back to zero, use the gcloud compute instances delete command:
CAUTION: This will delete all your instances, disks and data on your machines. Use this only if you want to get rid of everything and start from scratch.
for counter in {1,2,3}; do
  gcloud compute instances delete \
    --project ${GCP_PROJECT_ID} \
    --zone ${GCP_ZONE_ID} \
    --delete-disks=all \
    "mysql-db-${counter}"
done
TLDR
In the end, we used this same process for setting up new clusters or additional slave servers for our database. Because we are now on at Google Cloud Platform, we can take advantage of going all the way up to 64TB per instance. We also have more flexible compute and memory instance options. When we move the rest of our services to GKE (Google Kubernetes Engine) we would have our data store nearby and ready to be used.
One assumption of a highly available database that stuck with me for many years was that replication and failover are handled by the same product. It turns out replication is just one part of the equation and how you handle failover to the slave databases when the master has issues is a totally different process. MHA (Master High Availability Manager) is a popular choice for this, so is MRM (MariaDB High Availability: Replication Manager). You can also go the cluster way having 3 or more nodes and a proxy with solutions like Galera, MaxScale, XtraDB Cluster, MySQL Cluster (NDB). Percona has a good article about this topic.

I hope this guide was of use to someone out there and if you have questions or suggestions or just want to say Hi!, hit me up on Twitter @kzapkzap.